Drawing Expressions. Part 4
This time we will learn tips and tricks how to draw three types of expressions: angry, sad and sleepy.
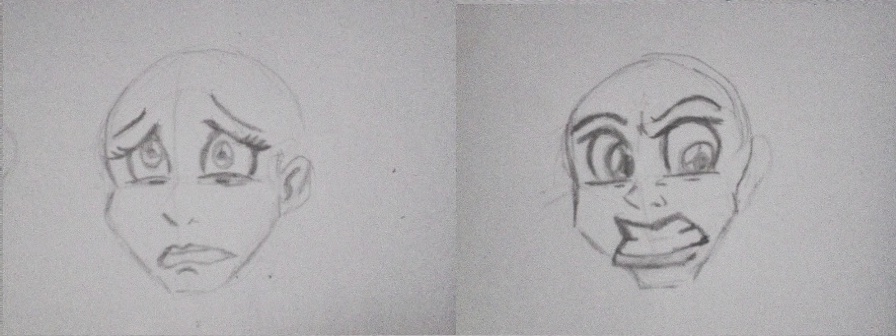
Angry expression
Same as it was made for the previous drawing expression series, you should draw the basic head shape using your pencil. This time, the head should be tilted that it made the curve of the eyebrows a little tricky to get looking right. You have to sketch it one side to practice and be able to achieve the right curve to use for this expression.

Then push the upper lids further compared to the ones in the previous lessons because this expression is a bit more extreme. The same goes to the mouth. Push the lower jaw out ever to slightly past the edge of the upper jaw. Then finish it up with drawing in first the lower eyelids which were raised against the eyeball.

Followed it by adding some quick lines above the nostril. This line indicates that the nose was being scrunched up. If you try to take away these little tricks above the nostril, you will notice that the scrunched nose becomes relaxed. And there you have it. The Angry Face.

Sad expression
After that, we propose you to draw another expression which is the sad expression. This time, make the eyebrows curved upwards toward the middle to make your character look like sad. The corners of the mouth were pulled down, and make sure that the bottom of the lip is a bit stuck out than the usual.

Then finish the eyes by adjusting the amount that the eyelids cover the eye. You may also push it up slightly.

Afterwards add some eyelashes that curved out and upward from under that mass of skin. And that’s all there is to it!

Sleepy expression
The last lesson for drawing expression series is the sleepy face. Draw the head same as the others in the series but with a few slight differences this time. Since we are making a sleepy face, everything or the whole body gets pulled downward just like every time we are tired that we have to slump our body downwards because we don’t have the strength to fight against gravity. Draw the neck in a curve manner which looked like struggling to support the weight of the head as it pulls down towards the ground as well as the shoulders which are sloping down also.

The eyebrows should be float upward, while the upper eyelids looked like struggling to keep the eyes open. After that, sketch in the mouth with its corner pulled downwards too and is a bit open just like yawning.

And finish your drawing by adding more details to the upper eyelids and the nose. Also include in the details the upper teeth and tongue and sketch is finished!

Hope you are satisfied with the results after being able to finish everything on how to draw different expressions in the series. Though at first it is difficult, but with practice and focus you will make it better and better time after time. You only need to grab your pencil and you’re all set for a great adventure and experience. No extra steps required. Just have fun and enjoy everything that this tutorial has to offer.