How To Draw The Human Body
The best way to start learning body proportions is to study the classic division of the human body into eight equal parts, from the top of the head to the bottom of the feet. Each of these eight parts is roughly the size of a head. The four lower parts are the legs. The knee cap is places on the second division. The waist is on the fifth and the top part consists of the head.

Remember that these are idealized measures. No two people look exactly the same (with the exception of identical twins) so you have to change the body proportions slightly if you want to depict a specific model. For example most people have a slightly larger head and shorter legs than this classical template. On the other hand if you want a more exaggerated look, like a comic superhero, you might want exaggerate specific parts (especially those related to his/her superpowers).

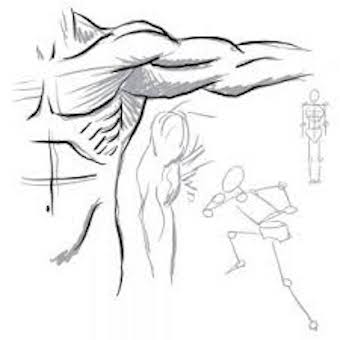
That’s all relatively simple if you’re drawing a person just standing straight up. But in most cases you’ll want to add perspective and action to the character; make him bend, jump or crunch for example. Then it gets much more difficult to compare the sizes of the different body parts, an arm extending towards you will seem shorter and so on. To get around this problem you have to think of the human body as a collection of simple shapes. If you think about the arm as a cylinder it will be much easier to figure out how it should look like in 3D.

Buy a wooden drawing mannequin (model) and place it on your desk. The mannequin is made up of simple shapes and is a great way to learn how to keep the body part sizes in perspective as it moves in different ways. Keep practicing and you’ll soon notice you get the hang of it.
Another approach that helps you to learn moving human figures requires you to know the basic bone structure of the human figure. The bone structure gives most of the proportions and overall shape of the body so if you know and understand this, and can use the information in your drawing; you have half the job done!

If you study a diagram of the bone structure, you can see that the body consists of three solid masses, the head, the chest and the hip. They are joined together by the spine which controls the movement of these three masses. It’s very important to note that even though the head, chest and hip can move independently from each other, they are connected and the movement of one body part most often affects the other parts. If your head moves, the chest often moves too etc.
When studying bone structure you’ll find that the bones are full of small odd shapes and irregularities. As an artist you don’t need to get too concerned about these, but focus your attention on the main basic shapes and proportions. You also need to know the shapes of the bones that are not covered with muscles, like the elbow, the clavicle etc, but details that are hidden below the surface you don’t need to worry so much about.
Once you practiced enough using drawing mannequins and studying the bone structure, it’s time to perfect your abilities. Drawing from real life is an excellent way to perfect your skills in drawing the human figure. Not only will you improve your knowledge of the shape and proportions of the body but you’ll also learn where to add shadings and shadows and how to draw all those small details that make a drawing more lively and natural.
When drawing with a model it’s a good idea to va

ry the times for the different poses. Longer poses, perhaps 10 or 15 minutes each, which will give you time to focus on all details and shading, alternated with quick 30 second poses. 30 seconds might sound extremely quick and absurd, but this will force you concentrate on the main forms. You will learn to quickly see what is important to create a realistic drawing, and what is not.
Just one more note: if you don’t get a friend to pose for you, check out local artist clubs. They may be organizing a workshop with live models from time to time.