How To Draw One-Point Perspective
Perspective drawing is a technique developed by architects in early 15th century to represent a three-dimensional image on a two-dimensional plane. It remained as the basic principle of western arts for about 500 years. In this present age this technique is already well-known and being used by many artist, and as a lover of art I am going to teach you how to draw one-point perspective drawing.
Did you know that it possible for you to draw a train coming out from a paper? What I mean is that you may able to depict a picture of a train that looks like moving towards you as if it is real. Yes, that is possible if you are to draw it using one-point perspective. But do you know how it is done?
In this article we are going to cover the four steps procedure used by most artists to draw images with one-point perspective.
Choose a Vanishing Point
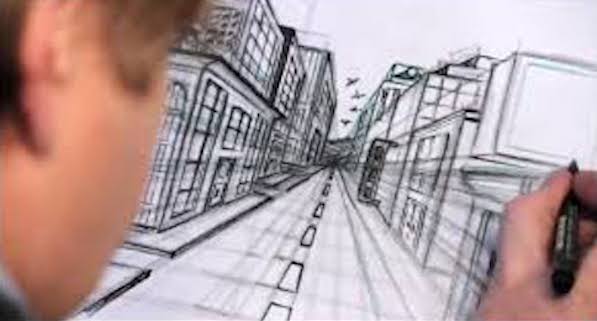
As the first and most important part of one-point perspective drawing, a vanishing point is a point on your drawing plane where all orthogonal lines meet. One best example for this is the part on a highway where the road seems to vanish from your sight. Therefore objects and spaces appear to be smaller as they go nearer the vanishing point until they seems to disappear. The best vanishing point is located on someplace where your image will appear on the center of your paper as a spotlight.
Draw a Horizon
The horizon line is a horizontal line across your drawing plane that passes through your vanishing point. This line is used to indicate the perspective views of images on your drawing or in the real world it represents the viewer’s line of sight where an object is divided into two views, the base and the top view. As an example, the floor is visible under the viewer’s line of sight and the ceiling above it. In a simple statement the horizon determines from where the viewer is observing.

Draw the Orthogonal Lines
These are extension lines from your vanishing point that serves as guidelines for your image and most likely gives the shape of your drawing. Orthogonal lines are usually used sketch the outlines of your image, its edges, division and sides.
Draw Additional Lines: Horizontal, Vertical, Sloping and Curves
After drawing all orthogonal lines we then draw some other lines that will help us to form the image we like to illustrate. Most of these lines are horizontal and vertical lines. Wheels are sometimes drawn with the use of coins to create a perfect shape, but since we are talking about one-point perspective drawing it is more preferable to draw ellipse by freehand rather than a circle unless it is facing the front view.
Drawing the final sketch of your image in a one-point perspective would now be easy. After following these steps all you have to do is erase some exceeding lines and add more details on your work, these includes varying the tone and contrast and adding shadows. And be reminded always that the pre-sketched of the image must be drawn in thin lines for us to easily erase the exceeding lines after doing the final sketch.

Subjects that involve regular shape are easier to draw in one-point perspective than those that don’t. Apply what you have learned to improve your skills and that someday you will be able to draw not only one-point perspective drawing but also other kinds of perspective drawing that involves subjects with irregular shapes.